本文中的所用到的代码和文件可以从下列地址获取:
- 0sheldonhuang0/nac-python-gui (github.com),本项目根据 PySimpleGUI/PySimpleGUI-YOLO: A YOLO Artificial Intelligence algorithm demonstration using PySimpleGUI (github.com) 进行修改。
- 供测试的
.weight文件可以从百度网盘 或 Google Drive 下载,提取码微信搜索晓栋XD,回复目标检测即可。若需要自行训练数据集获得自定义的.weight文件,可以访问这篇文章:目标检测用 YOLO:制作自己的数据集(观赏鱼)并使用 Darknet YOLOv4 在线训练 | 晓栋XD (xd.sh.cn)。
使用 GUI (图形用户界面)的优点是用户应该能够立即使用应用程序,并能快速找到和使用他们想要的功能。在日常生活、工作中使用到的应用程序(浏览器、office、微信等等)就是 GUI 的体现,它使我们的工作变得效率更高、门槛更低。
之前在桌面端只试过使用 Matlab 制作 GUI,具体可以查看这篇文章:Matlab GUI app designer 多人消费付款记账催债系统 。使用 Matlab 的 APP designer 或者 Guide (已过时)可以非常方便的制作出界面,因为只要拖拽即可。但是使用Matlab制作界面对于应用的使用者来说非常不便:它打包后的体积非常大,而且需要安装额外的 Matlab 运行库才能够使用。
Python 作为目前非常“流行”的编程语言,实际上确实非常好用。对于我来说,它能够把日常琐碎重复的工作自动化完成,比如说文件重命名、批量替换等。制作图形界面能够让使用者更加方便的使用这些功能,而不是面对漆黑一片的代码行。
在网上看到这么一句话:PySimpleGUI 是适用于人类使用的 Python GUI。它将 tkinter,pyQt,WxPython 等 Python 知名的 GUI 库转换为可移植的、用户更友好的界面开发库。当然缺点也是显而易见的,PySimpleGUI 只能制作出极为基础的界面,可能无法实现复杂且好看的界面设计。
创建的步骤
界面部分
firebase_login
下文以最简单的 firebase_login 界面为例:
- 建议安装 Anaconda 管理库文件、使用 Python。
- 使用 Anaconda Prompt 安装 PySimpleGUI,如果安装过程中提示需要安装其他的安装包,安装即可 :
pip install PySimpleGUI- 引入文件:
import PySimpleGUI as sg- 创建一个 PySimpleGUI 界面。该界面中有两个需要提交的变量:一个是
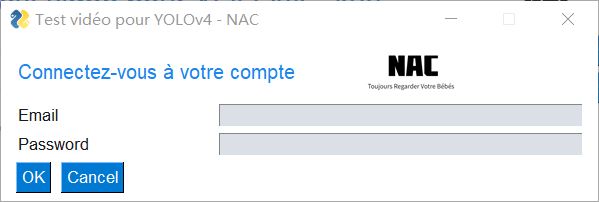
用户邮箱、还有一个是用户密码,点击 OK 按钮之后即可执行验证 try。该界面中有以下几个元素,一个标题和图片、两个输入框、两个按钮:sg.Text创建文字,可以设置字体、大小、颜色和位置等。sg.Image引入图像,若其需要和上述的文字排列在同一行,则需要写在同一数组中。sg.OK,sg.Cancel这是两个固定了文字的按钮,当然也可以自定义创建按钮,当点击事件(event)为 Cancel 或者用户点击关闭时,将退出应用;反之,将执行登录的步骤:
sg.ChangeLookAndFeel('Reddit')
layout = 	[
    [sg.Text('Connectez-vous à votre compte', size=(30,1), font=('Helvetica',12),text_color='#1c86ee' ,justification='left'),\
     sg.Image(r'images\nac-logo.png',key = "_WEATHER_IMG_",size=(100, 50))],
    [sg.Text('Email'), sg.In(size=(40,1), key='_USER_EMAIL_')],
    [sg.Text('Password'), sg.In(size=(40,1), key='_USER_PASSWORD_')],
    [sg.OK(), sg.Cancel()]
]
win = sg.Window('Test vidéo pour YOLOv4 - NAC',
                default_element_size=(21,1),
                text_justification='left',
                auto_size_text=False).Layout(layout)
event, values = win.Read()
if event is None or event =='Cancel':
    sys.exit()

UserEmail = values['_USER_EMAIL_']
UserPassword = values['_USER_PASSWORD_']

auth = firebase.auth()

try:
    # Connexion 登录
    user = auth.sign_in_with_email_and_password(UserEmail, UserPassword)
    sg.popup('登录成功!欢迎', UserEmail)
    pickle.dump(user,open('user_info.txt','wb'))
    userUniqueId = UserEmail.replace("@","__").replace(".","_")
    pickle.dump(userUniqueId,open('user_id.txt','wb'))
except:
    sg.popup('发生了一些错误,可能是用户名/密码错误!')
win.Close()
yolo_video_with_webcam
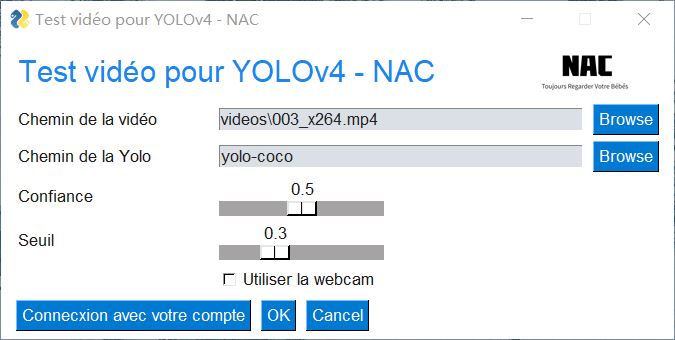
下文为主功能界面的部分主要代码,其功能性的代码详见另一篇文章。
sg.In输入框sg.Slider滑块,可以定义数值范围sg.Button和上文中类似,但是新定义了一个按钮;点击之后会执行sg.FileBrowse浏览文件按钮sg.FolderBrowse浏览文件夹按钮
i_vid = r'videos\003_x264.mp4'
o_vid = r'output\car_chase_01_out.mp4'
y_path = r'yolo-coco'
sg.ChangeLookAndFeel('Reddit')
layout = 	[
		[sg.Text('Test vidéo pour YOLOv4 - NAC', size=(28,1), font=('Helvetica',18),text_color='#1c86ee' ,justification='left'),\ # 换行
             sg.Image(r'images\nac-logo.png',size=(100, 50))],
		[sg.Text('Chemin de la vidéo'), sg.In(i_vid,size=(40,1), key='input'), sg.FileBrowse()],
		[sg.Text('Chemin de la Yolo'), sg.In(y_path,size=(40,1), key='yolo'), sg.FolderBrowse()],
		[sg.Text('Confiance'), sg.Slider(range=(0,1),orientation='h', resolution=.1, default_value=.5, size=(15,15), key='confidence')],
		[sg.Text('Seuil'), sg.Slider(range=(0,1), orientation='h', resolution=.1, default_value=.3, size=(15,15), key='threshold')],
		[sg.Text(' '*8), sg.Checkbox('Utiliser la webcam', key='_WEBCAM_')],
		[sg.Button('Connecxion avec votre compte'),sg.OK(), sg.Cancel()]
			]

win = sg.Window('Test vidéo pour YOLOv4 - NAC',
				default_element_size=(21,1),
				text_justification='left',
				auto_size_text=False).Layout(layout)
event, values = win.Read()
if event is None or event =='Cancel':
	exit()
if event == 'Connecxion avec votre compte':
 	firebase_login.firebaseLogin()
use_webcam = values['_WEBCAM_']
args = values

win.Close()
后一个界面分为左边栏和右边栏:
position_elem = win.FindElement('_POSITION_'):寻找界面中 key 为_POSITION_的元素。position_elem.Update(targetPosition):将上面寻找到的元素更新为一个新的值。event, values = win.Read(timeout=0):获取GUI中所有数据和变量。gui_confidence = values['confidence']:获取GUI中的变量。firebase_login.firebaseUploadData(targetPositionObject,timeRightNow):调用firebase_login文件中的firebaseUploadData的函数。
	if not win_started: # if win_started is not None
		win_started = True
		sg.SetOptions(text_justification='Center')
        # 左边栏
		left_col =  [#界面元素#]
        # 右边栏
		right_col = [#界面元素#]
		layout = [
			[sg.Column(left_col, element_justification='c'), sg.VSeperator(),
			sg.Column(right_col, element_justification='c')]
		]

		win = sg.Window('YOLO Output',
						default_element_size=(14, 1),
						text_justification='left',
						auto_size_text=False).Layout(layout).Finalize()
		position_elem = win.FindElement('_POSITION_')
        #其他需要更新的元素#
	else:
		position_elem.Update(targetPosition)
		#其他需要更新的元素#

	event, values = win.Read(timeout=0)

	if event is None or event == 'Exit':
		break
	gui_confidence = values['confidence']

	loopTimes=loopTimes+1
	if loopTimes % loopInterval == 0:
		timeRightNow = round(time.time());
		cv2.imwrite('image_raw/'+ str(timeRightNow) + '.jpg',frame) #存储为图像
		firebase_login.firebaseUploadData(targetPositionObject,timeRightNow)
检测部分

检测使用了 OpenCV-Python结合 YOLOv4-darknet 训练得到的 weight 文件,检测部分完整的代码文件可以查看下列地址:0sheldonhuang0/nac-python-gui (github.com)。coco.names内包含了需要检测的目标名称,给每个标签配上不同的颜色,以便区分。
labelsPath = os.path.sep.join([args["yolo"], "coco.names"])
LABELS = open(labelsPath).read().strip().split("n") #打开标签

# 每个对象配备了不一样的颜色,以便在图片中标记时便于区分。
np.random.seed(1)
COLORS = np.random.randint(0, 255, size=(len(LABELS), 3),
    dtype="uint8")
加载 YOLO weight 和 Config 文件:
- 使用
cv2.dnn.readNetFromDarknet加载网络。 - YOLO 含有很多的图层,
getUnconnectedOutLayersNames()用于提取输出图层的名称。
# 加载 YOLO weight 和 Config 文件
weightsPath = os.path.sep.join([args["yolo"], "custom-yolov4-detector_final.weights"])
configPath = os.path.sep.join([args["yolo"], "custom-yolov4-detector.cfg"])

# 加载 YOLO 文件
print("[INFO] loading YOLO from disk...")
net = cv2.dnn.readNetFromDarknet(configPath, weightsPath)
ln = net.getLayerNames()
ln = [ln[i[0] - 1] for i in net.getUnconnectedOutLayers()]

# 初始化视频,输出视频的帧率和画面尺寸
vs = cv2.VideoCapture(args["input"])
writer = None
(W, H) = (None, None)
读取视频或者摄像头中下一帧的数据:
# 读取视频或者摄像头中下一帧的数据
if use_webcam:
    grabbed, frame = cap.read()
else:
    grabbed, frame = vs.read()
    # 分辨率-宽度
    zone_width = int(vs.get(cv2.CAP_PROP_FRAME_WIDTH))/4
    # 分辨率-高度
    zone_height = int(vs.get(cv2.CAP_PROP_FRAME_HEIGHT))/2
检测每一帧图片,frame 为视频截帧得到的图片:
    # 如果每帧图片尺寸为空,那抓取它
    if W is None or H is None:
        (H, W) = frame.shape[:2]
    # 从输入图像构造一个 blob,然后执行 YOLO 对象检测器的前向传递
    # 得出边界和概率
    blob = cv2.dnn.blobFromImage(frame, 1 / 255.0, (416, 416),
        swapRB=True, crop=False)
    net.setInput(blob)
    start = time.time()
    layerOutputs = net.forward(ln)
    end = time.time()
初始化边界框、置信度、目标种类的数组,循环提取每个输出层,每一层中可能有多个框。提取当前目标的目标对象的种类和置信度,由于可以自行设置置信度的最低值,舍弃检测结果小于最低值的部分。最后得出方框的坐标和其他必要的信息,最后将显示在图片上。
   # 初始化边界框、置信度、目标种类的数组
    boxes = []
    confidences = []
    classIDs = []

    # 循环提取每个输出层
    for output in layerOutputs:
        # 循环提取每个框
        for detection in output:
            # 提取当前目标的类 ID 和置信度
            scores = detection[5:]
            classID = np.argmax(scores)
            confidence = scores[classID]

            # 通过确保检测概率大于最小概率来过滤较不精确的预测
            if confidence > gui_confidence:
                # 将边界框坐标相对于图像的大小进行缩放,YOLO 返回的是边界框的中心(x, y)坐标,
                # 后面是边界框的宽度和高度
                box = detection[0:4] * np.array([W, H, W, H])
                (centerX, centerY, width, height) = box.astype("int")

                # 转换出边框左上角坐标
                x = int(centerX - (width / 2))
                y = int(centerY - (height / 2))

                # 更新边界框坐标、置信度和种类 id 的列表
                boxes.append([x, y, int(width), int(height)])
                confidences.append(float(confidence))
                classIDs.append(classID)

    # gui_confidence:置信度的阈值
    # gui_threshold:非最大抑制的阈值(调整容错率)
    idxs = cv2.dnn.NMSBoxes(boxes, confidences, gui_confidence, gui_threshold)
    targetPosition = []
    targetDetailNumber = []
    zone_info = []
在下方代码后有一大段是为了便于将检测的数据转为可以上传至 Firebase 的 Json 数据,这里便不再赘述。至此,程序可以检测出所输入的视频或者摄像头录像中每一帧图片中所包含的目标物体和它们的位置,并且使用方框、名称和置信度标注出来。
下一步将跳转至上一节中界面部分中的yolo_video_with_webcam界面,并且可以每隔一段时间将图像和目标数据上传至 Firebase 和本地。
# 确定每个对象至少有一个框存在
if len(idxs) > 0:
    # 循环画出保存的边框
    for i in idxs.flatten():
        # 提取坐标和宽度
        (x, y) = (boxes[i][0], boxes[i][1])
        (w, h) = (boxes[i][2], boxes[i][3])

        targetDetailNumber.append(classIDs[i])
        targetPosition.append([x+w/2,y+h/2]) # 每一帧的目标数量和位置

        # [[793.0, 517.0], [796.5, 423.0], [841.5, 367.0], [889.5, 499.5],
        # [1001.5, 584.0], [254.5, 480.5], [204.0, 420.5], [693.5, 343.5],
        # [73.0, 504.0], [123.5, 368.5], [752.0, 280.0], [1017.0, 508.5],
        # [1232.0, 683.0], [14.5, 473.5], [398.0, 86.0], [1225.0, 374.5],
        # [1097.0, 139.5], [1098.0, 600.5], [61.5, 172.5], [723.0, 140.0],
        # [863.0, 174.0]]
        print(targetPosition)
        # [2, 2, 2, 2, 2, 2, 2, 2, 2, 2, 2, 2, 2, 2, 2, 2, 2, 2, 2, 2, 0]
        print(targetDetailNumber)

        # 画出边框和标签
        color = [int(c) for c in COLORS[classIDs[i]]]
        cv2.rectangle(frame, (x, y), (x + w, y + h), color, 2)
        text = "{}: {:.4f}".format(LABELS[classIDs[i]],
                                   confidences[i])
        cv2.putText(frame, text, (x, y - 5),
        cv2.FONT_HERSHEY_SIMPLEX, 0.5, color, 2)
使用说明
可以直接从 Github 上面下载本程序的源码,推荐使用 Anaconda 和 Spyder 进行编辑,并且需要主要安装以下一些包。若仍然缺少包,则仅需下载对应的包即可。
- OpenCV-Python
- Pyrebase4
- PySimpleGUI
- Numpy
- imutils
在安装完库之后,运行即可看到目标检测的实况。界面如上文的三张图所示,但可能和最终的界面有所不同。用户在正常情况下将执行 exe 文件启动桌面端软件。
- 首个页面中上方两个输入框可以进行测试:如果用户有目标视频文件和对应的 weight 文件,那么可以从此处导入(注意导入文件和文件夹的路径是相对路径)。用户可以选择置信度和阈值,用户在点击 OK 之后即可进行预测。
- 若用户的设备有摄像头,则可以勾选下方的使用摄像头选项,点击 OK 之后即可识别和检测摄像头所捕捉到的画面。
- 用户在识别页面将只能调整检测的置信度和阈值,其他调整选项将放在在设置页面。上传的间隔时间,在目前版本无法调整,但在考虑范围之内。
若用户有本系统的账号和密码,则可以通过左下角的按钮进行登录。如果登录成功,桌面端将会隔一段时间将用户所检测到的目标数据和图像上传至 Firebase。若用户没有登录, 则无法上传成功且在目前版本可能出错。
- 用户的账号和密码可以通过网页端进行注册和设置。
- 用户登录账号之后可以看到相应的反馈,若登录成功则会显示用户登录成功,但目前登录的有效时间是一个小时,当前版本在暂不支持续期。
- 供测试的
.weight文件可以从百度网盘 或 Google Drive 下载,提取码微信搜索晓栋XD,回复目标检测即可。若需要自行训练数据集获得自定义的.weight文件,可以访问这篇文章:目标检测用 YOLO:制作自己的数据集(观赏鱼)并使用 Darknet YOLOv4 在线训练 | 晓栋XD (xd.sh.cn)。
请问那个从github上下载下来后,怎么打开登录等界面啊。
网站也注册了,但是对.py文件编译一直报错
您好!你可以使用这个链接再尝试一下https://xd.sh.cn/pje-nac-instructions/,另外今天站点做了点调整 xd.sh.cn/nac 这个路由还没有弄,
现在打不开🤣目前可以打开 https://xd.sh.cn/nac/espace 了,但是路由还是有些小问题。